Disk space plays a big role in smoothly running Windows 11. If your storage is almost full, your system struggles to create temporary files, install updates, and run apps properly, which make your laptop feel slow and unresponsive. The common signs of low storage are: laptop feels slow, freezes frequently, fails to update windows or takes a long time, apps require a long time to open, shows Low Disk Space warning, files fail to save or download etc.
So, how to free up disk space on Windows 11?
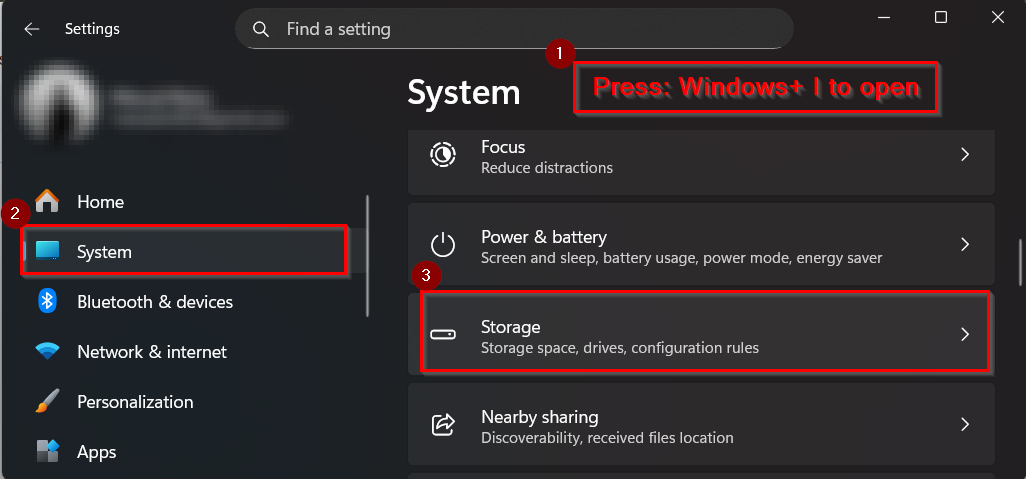
To free up disk space on windows 11, follow these steps-
- Open Settings using Windows + I → click System → select Storage.
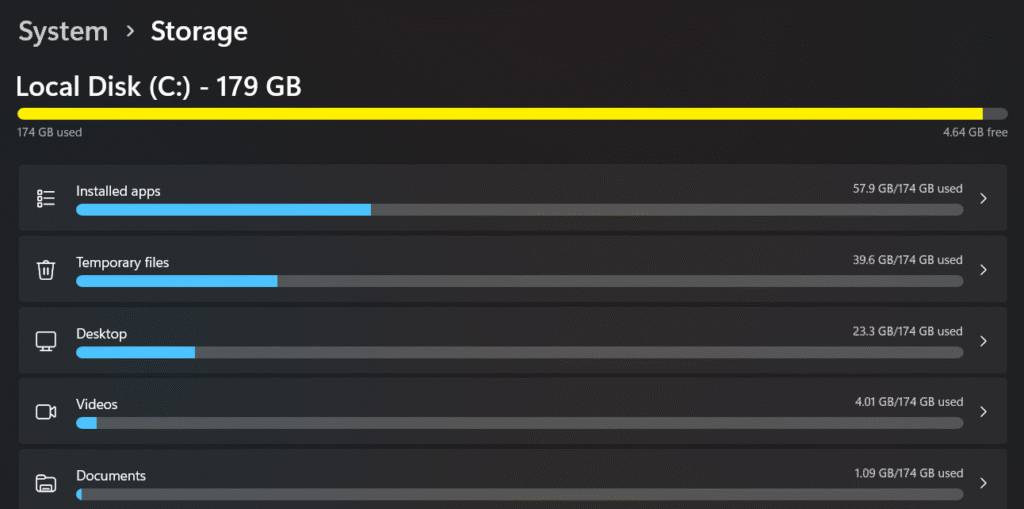
- Wait for Windows to calculate space usage by category such as Apps, System, Temporary files, and Other.
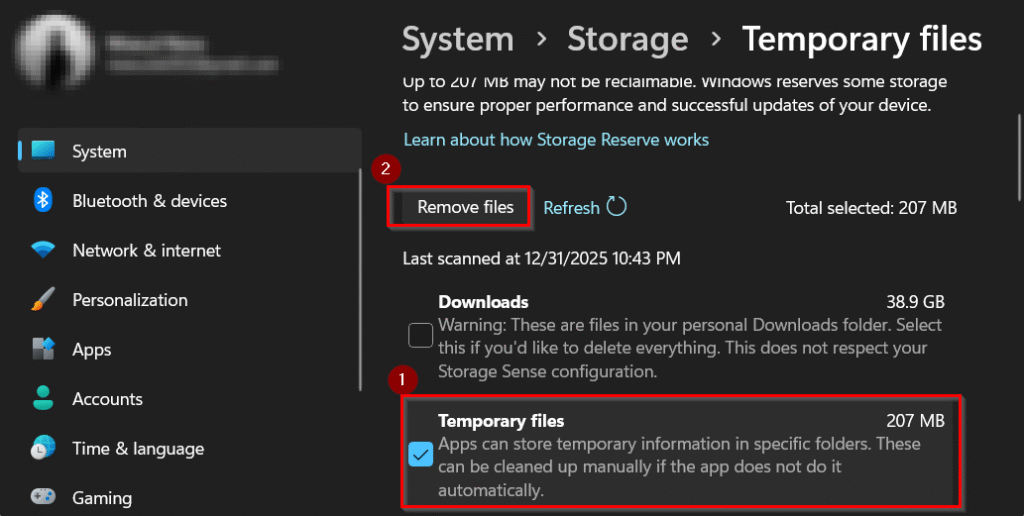
- Open Temporary files, review each item, then select safe options like Recycle Bin or Temporary Windows files and click Remove files.
In this guide, I will focus only on safe and built-in Windows methods to free up disk space on Windows 11 and 10. You will learn how to remove junk files, temporary data, unused apps, and large unnecessary files without deleting personal documents, photos, or important system files.
In This Post......
- Method 1: Check What Is Taking Up Disk Space in Windows 11 & Free Up Safely
- Method 2: Use Storage Sense to Automatically Free Up Space
- Method 3: Delete Temporary Files Safely
- Method 4: Update Cache
- Method 5: Clean Up Junk Files Using Disk Cleanup
- Method 6: Uninstall Unused Apps and Programs
- Method 7: Clean Browser Cache and App Data
- What NOT to Delete on Windows 11
- How Much Free Disk Space Windows 11 Needs
- When Freeing Disk Space Is Not Enough
- Frequently Asked Questions
- How to free up space on an HP laptop with Windows 10?
- How to clean up system files in Windows 11?
- How to clean up the C drive in Windows 11?
- Is Disk Cleanup still safe to use on Windows 11?
- Why does my HP laptop keep running out of space?
- How much free space should I keep for smooth performance?
- What should I avoid deleting to free space?
- People Also Search For:
- Final Thoughts
Method 1: Check What Is Taking Up Disk Space in Windows 11 & Free Up Safely
Storage Settings is the primary Windows 11 tool for understanding disk usage. We use this approach when we want a clear breakdown before deleting anything. In this system, you will be able to see the categories like Apps, System, Temporary files, and Other. Always check first, then clean only recommended sections. So, How to see what’s taking up space on PC Windows 11?
To check disk space usage and remove the heavy file safely, follow these steps-
1. Open Settings using Windows + I → click System → select Storage.
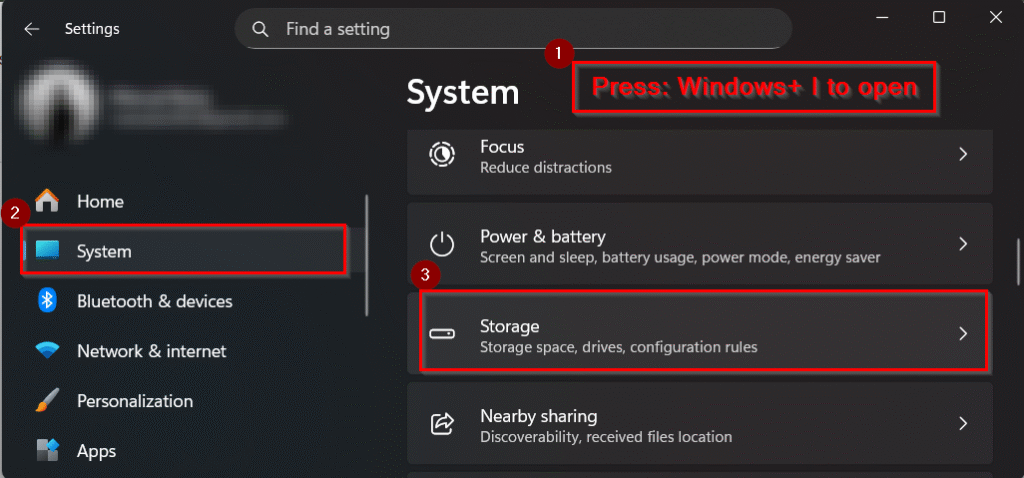
2. Wait for Windows to calculate space usage by category such as Apps, System, Temporary files, and Other.
3. Open Temporary files, review each item, then select safe options like Recycle Bin or Temporary Windows files and click Remove files.
Note:
- Do not delete files from the System category manually.
- Always review Downloads before cleaning
Method 2: Use Storage Sense to Automatically Free Up Space
Storage Sense reports provide automatic tracking of disk usage trends. Use this method if Storage Sense is enabled. It highlights areas where space is frequently consumed. Review reports before enabling auto-cleanup.
Steps:
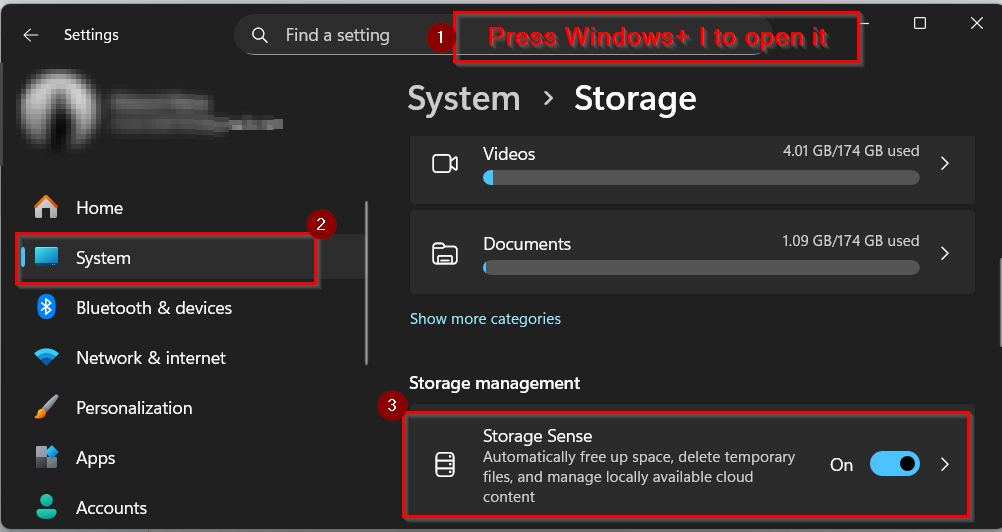
1. Open Settings > System > Storage.
2. Click Storage Sense.
3. Review usage history for Temporary files, Apps, and Cloud content.
4. Identify recurring space usage patterns before cleaning.
Note:
- Storage Sense does not delete personal files automatically.
- Cloud-only files can be re-downloaded anytime.
Method 3: Delete Temporary Files Safely
Windows Temporary Files are short-term files created by the operating system and apps to store temporary data. Windows Temporary Files are usually safe to delete when your PC feels slow or storage is running low. For example, after installing software or using apps heavily, these files may remain unused and take up space.
Steps:
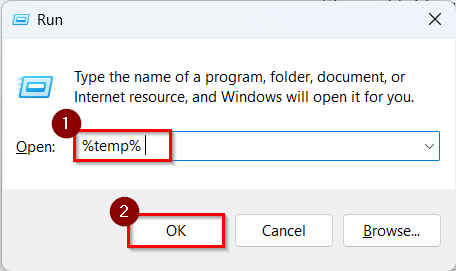
1. Press Windows + R on your keyboard to open the Run dialog box. Then, type %temp% and click OK.
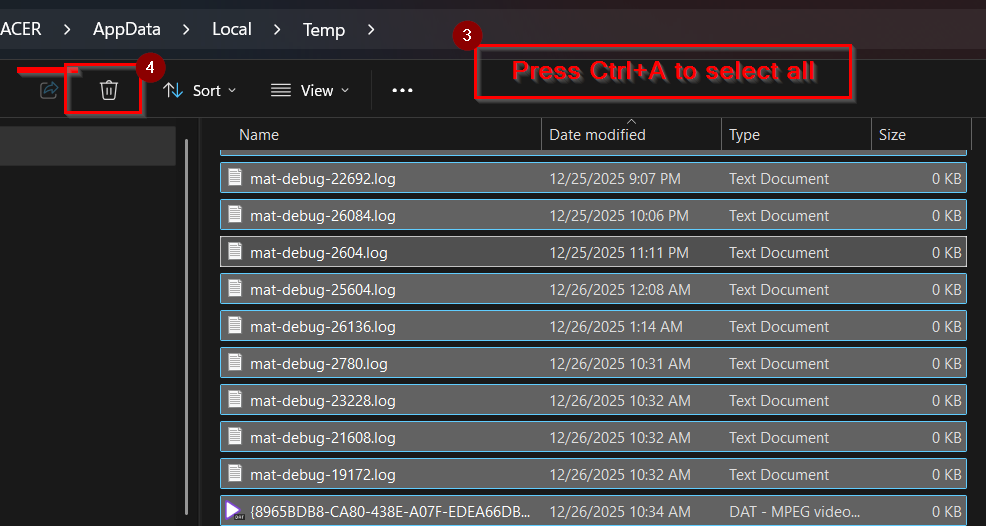
2. A File Explorer window will open showing temporary files. Press Ctrl + A to select all files and folders in this window.
3. Right-click on the selected files and click Delete. If a message appears saying some files are in use, click Skip.
4. Close File Explorer and empty the Recycle Bin to free up space completely.
Note:
- Some files cannot be deleted because they are currently in use
- Skipping files is safe and will not harm Windows
Method 4: Update Cache
Update Cache stores downloaded Windows update files before installation. Update Cache is useful during updates but can be deleted after updates are completed. For example, if Windows Update finished successfully, old cache files may still remain and occupy disk space.
The steps are the same as method-1. To see the image tutorial, please check the method-1 above.
1. Press Windows + I to open Settings.
2. Go to System → Storage.
3. Click on Temporary files under Storage. Wait while Windows scans for removable files.
4. Check the box labeled Windows Update Cleanup. Review other checked items carefully before proceeding.
5. Click Remove files to delete the update cache safely.
Note:
- Only delete update cache after updates are installed.
- Do not interrupt the removal process.
Alternatives,
Delivery Optimization Files
The delivery Optimization Files are used by Windows to share update data with other PCs. Delivery Optimization Files can grow large over time and are safe to remove when storage is low. For example, if you do not share updates across devices, these files are unnecessary.
Steps:
1. Open Settings using Windows + I.
2. Go to System → Storage.
3. Click Temporary files from the list. Allow Windows to calculate storage usage.
4. Select Delivery Optimization Files by checking the box. Make sure no important items are selected accidentally.
5. Click Remove files to clear them from your system.
Note:
- Removing these files will not affect future updates.
- Windows will recreate them if needed.
Method 5: Clean Up Junk Files Using Disk Cleanup
Clean Up Junk Files or Clean up system files Windows 11 using Disk Cleanup is a built-in Windows utility that removes unnecessary files from your system. This approach is used when our Windows 11 PC shows low storage warnings or becomes slow. For example, after Windows updates or long-term usage, temporary files and old system data can consume several gigabytes of space. So, how to increase C drive space Windows 11?
To Windows 11 clean up disk space, follow these steps-
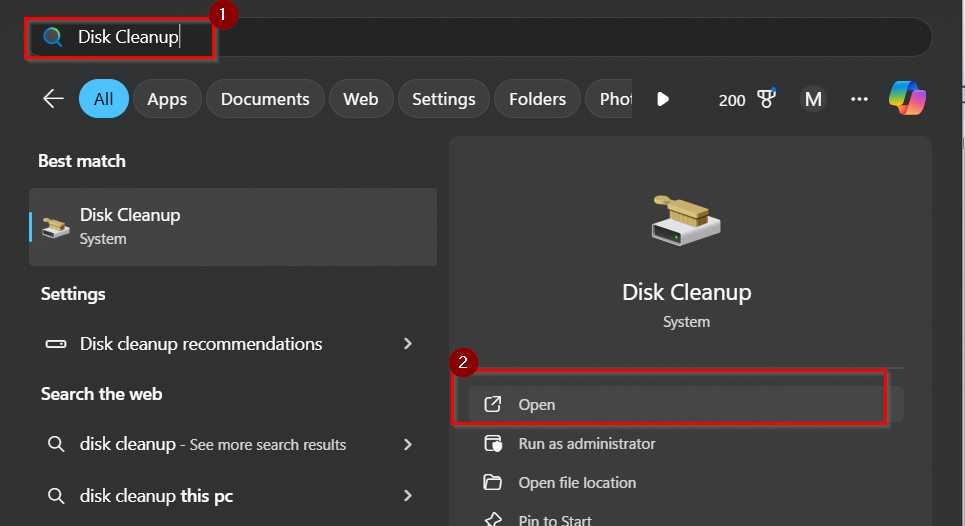
1. Click on the Search icon on the Windows 11 taskbar. Type Disk Cleanup in the search box and click the Disk Cleanup app from the results.
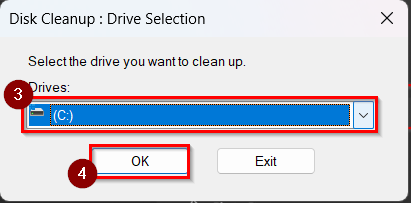
2. If prompted, select the drive you want to clean, usually Local Disk (C:). Click OK to allow Windows to scan the selected drive.
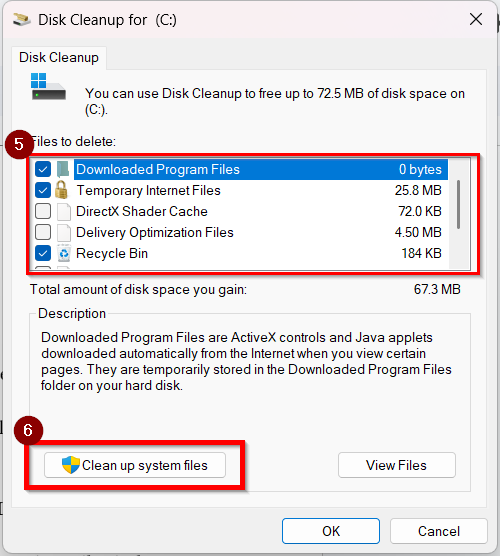
3. After the scan completes, a list of files will appear under Files to delete. Check boxes such as Temporary files, Recycle Bin, and Thumbnails.
4. Click Clean up system files to include deeper cleanup options. Select the C: drive again when asked, then wait for the scan to finish.
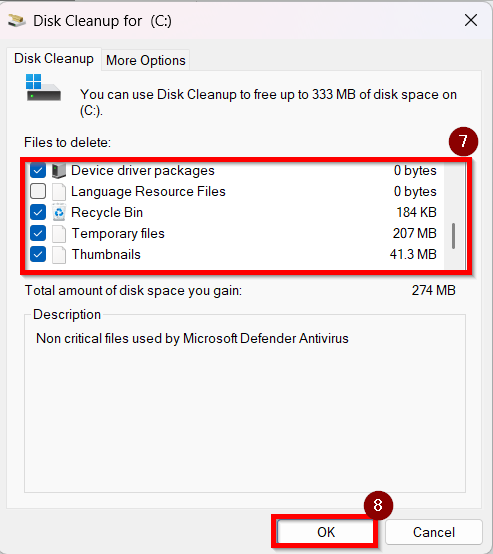
5. Review system file categories like Windows Update Cleanup and Delivery Optimization Files. Check only the items you understand and no longer need.
6.Click OK, then choose Delete Files to confirm the cleanup process. Wait until Windows completes deleting the selected junk files.
7. Restart your computer to ensure all cleared space is fully released. Check available disk space from this PC after reboot.
Note:
- Disk Cleanup still works in Windows 11 despite newer Storage tools.
- System files cleanup can free several gigabytes of space.
- Avoid deleting Downloads unless files are backed up.
- Windows may recreate some temporary files automatically.
Method 6: Uninstall Unused Apps and Programs
Uninstall Unused Apps and Programs is a practical way to free up disk space by removing software you no longer use. It is commonly used when large applications or old installers are occupying valuable storage. For example, unused video editors, games, ZIP files, and setup installers often remain in the system long after installation.
Steps:
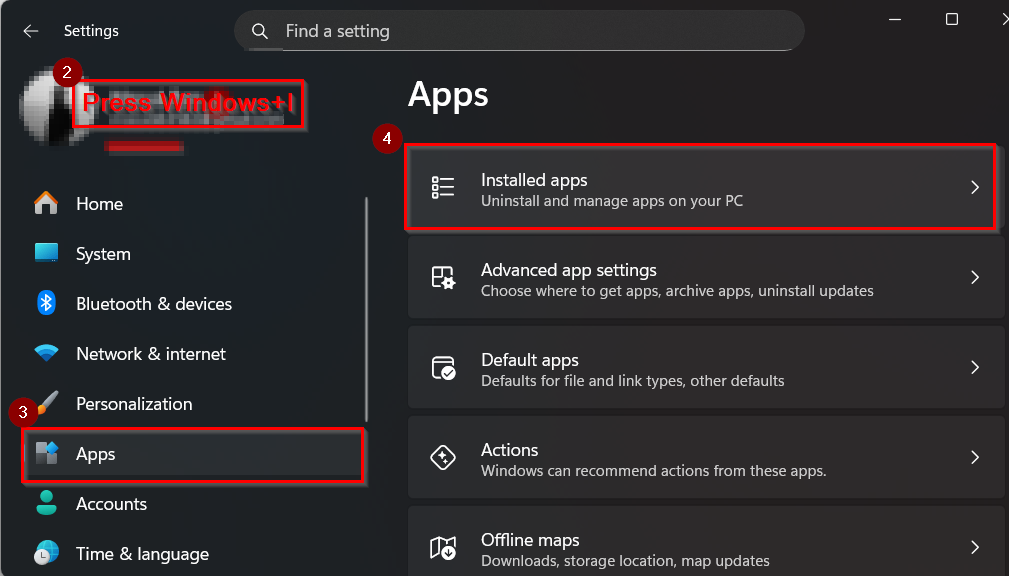
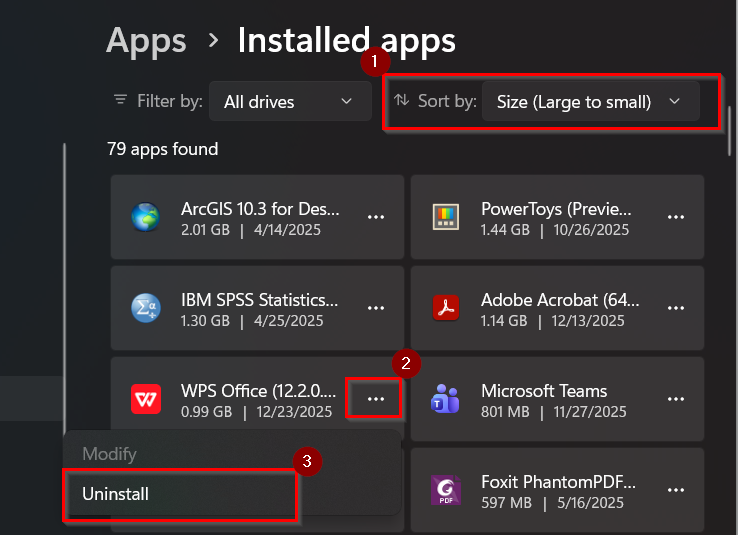
1. Press Windows + I to open Settings. Click Apps, then select Installed apps from the left panel.
2. At the top of the Installed apps page, click the Sort by dropdown. Choose Size to display the largest apps first.
3. Review the list carefully and identify apps you no longer use. Click the three-dot menu next to an app and select Uninstall.
4. Confirm the uninstall when prompted and wait for the process to finish. Repeat the same steps for other unused programs.
5. Open File Explorer and click Downloads from the left sidebar. Look for large videos, installers (.exe/.msi), and ZIP files.
6. Use the Search box in the top-right corner of File Explorer. Type extensions like .zip, .exe, or .mp4 to filter large files.
7. Select unnecessary files, right-click, and choose Delete. Empty the Recycle Bin to permanently free up the disk space.
Note:
- Do not uninstall system apps unless you know their purpose
- Keep important installers backed up before deletion
- Large video files often consume the most storage
- Sorting by size helps identify space-hogging apps faster
Method 7: Clean Browser Cache and App Data
Clean Browser Cache and App Data is a method that removes temporary internet files and stored app data from your system. It is used when browsers feel slow or storage fills up unexpectedly. This method works because cached images, videos, and offline data can grow very large. For example, frequent YouTube streaming or heavy browsing can create gigabytes of cache files.
1. Open Google Chrome on your Windows 11 PC. Click the three-dot menu in the top-right corner and select Settings.
2. In the left sidebar, click Privacy and security. Select Clear browsing data from the main panel.
3. In the pop-up window, choose the Time range as All time. Check Cached images and files and uncheck Passwords if you want to keep them.
4. Click Clear data and wait for Chrome to finish removing cache files. Restart Chrome to apply changes properly.
5. Press Windows + I to open Settings. Go to Apps → Installed apps to manage app storage.
6. Click on an app such as Microsoft Edge, Spotify, or Teams. Select Advanced options, then click Repair or Reset if cache size is high.
7. Restart your PC to ensure freed space is fully reflected in storage. Check disk space from this PC to confirm improvements.
Note:
- Clearing cache may sign you out of some websites.
- Do not clear saved passwords unless backed up.
- App reset removes local data but keeps the app installed.
- Cache will rebuild automatically over time.
What NOT to Delete on Windows 11
Freeing up disk space on Windows 11 is helpful, but deleting the wrong files can cause serious problems. Some files are essential for Windows to run properly. Before cleaning your PC, it is important to know what not to delete and why. Let’s check-
- C:\Windows folder: This folder contains core Windows system files. Deleting it can make Windows unbootable.
- Program Files / Program Files (x86): These folders store installed applications. Removing files manually can break apps and cause errors.
- System32 folder: This folder holds critical system drivers and DLL files. Deleting anything here can crash Windows.
- WinSxS folder: It supports Windows updates and system recovery. Deleting it manually can prevent updates or rollbacks.
- System Volume Information: This folder stores restore points and backup data. Deleting it removes recovery options.
- Drivers (.sys files): Driver files control hardware like Wi-Fi, sound, and display. Removing them can disable devices.
- AppData folder (without checking): It contains app settings and user data. Deleting it can cause apps to stop working or lose data.
- Documents, Pictures, Desktop folders: These folders often contain personal or work files. Deleting them can cause permanent data loss.
- Downloads folder (without review): Some files may still be needed, such as installers or important documents.
- Recovery or EFI partitions: These are required to repair or reset Windows. Deleting them can prevent system recovery.
Simple rule to remember: If you are not sure what a file is or Windows does not suggest deleting it, do not delete it manually.
How Much Free Disk Space Windows 11 Needs
Windows 11 works best with at least 20–25 GB of free disk space. Microsoft requires 64 GB total storage, but real-world use needs extra free space for updates and smooth performance.
On an SSD, low free space quickly reduces speed and lifespan, so keeping 25–30% free space is ideal. On an HDD, performance drops with low space too, but the impact is slower compared to SSDs.
When free space is low, Windows updates may fail, apps open slower, virtual memory struggles, and the system can freeze or lag. For best performance, always keep 20–30 GB free on your Windows 11 system drive.
When Freeing Disk Space Is Not Enough
Sometimes clearing files does not fix slow performance or storage warnings in Windows 11. In these cases, the problem is usually not just disk space.
The drive is almost full again quickly. This often means large apps, games, or sync tools like cloud storage are using space continuously. If your PC has a 64 GB or 128 GB drive, cleanup helps only temporarily. The drive size itself is the limitation. On HDD-based systems, even with free space, Windows 11 can feel slow due to hardware limits.
When RAM is low, Windows uses disk space as virtual memory, causing slowdowns even after cleanup. Apps running in the background consume resources and reduce overall system performance. Update files, restore points, and system caches can quickly refill freed space.
Frequently Asked Questions
How to free up space on an HP laptop with Windows 10?
Use Disk Cleanup, uninstall unused apps from Settings → Apps, delete temporary files, and clean the Downloads folder. These steps safely free space without affecting system files.
How to clean up system files in Windows 11?
Open Disk Cleanup, select drive C:, then click Clean up system files. Check options like Windows Update Cleanup and confirm deletion.
How to clean up the C drive in Windows 11?
Go to Settings → System → Storage → Temporary files, select safe items, and click Remove files. Also empty the Recycle Bin and uninstall unused apps.
Is Disk Cleanup still safe to use on Windows 11?
Yes. Disk Cleanup is safe and effective in Windows 11, especially for removing system and update-related junk files.
Why does my HP laptop keep running out of space?
Large apps, Windows updates, cache files, and a small storage drive can quickly fill space. Enabling Storage Sense helps manage this automatically.
How much free space should I keep for smooth performance?
Keep at least 20–30 GB free on the system drive for updates and stable performance.
What should I avoid deleting to free space?
Do not delete C:\Windows, System32, Program Files, or recovery files manually. Use built-in tools instead.
People Also Search For:
- How to clean up C drive in Windows 11
- Disk Cleanup tool in Windows 11
- How to see what’s taking up storage on a Windows 11 PC
- Ways to increase C drive space in Windows 11
- Clean up system files on Windows 11
- Free up disk space on Windows 11 laptop
- Remove temporary files in Windows 11
- Free up storage on HP laptop with Windows 10
- Storage Sense settings in Windows 11
Final Thoughts
Freeing up disk space on Windows 11 works best when you focus on safe, built-in tools. Use Disk Cleanup, Storage Sense, and uninstall unused apps first. Always keep 20–30 GB free space for smooth performance. Avoid deleting system files manually. If space runs out again quickly, upgrading storage or hardware may be the better long-term solution.